时间:2023-08-02 17:28
人气:
作者:admin
功能模块的硬件介绍
SPI是串行外设接口(Serial Peripheral Interface)的缩写,是一种高速的,全双工,同步的通信总线,并且在芯片的管脚上只占用四根线,节约了芯片的管脚,同时为PCB的布局上节省空间,提供方便,正是出于这种简单易用的特性,越来越多的芯片集成了这种通信协议,比如AT91RM9200。
功能模块的使用说明
工程创建
rtthread的numaker-m2354工程模板是下载的其他大佬修改好了的工程,
工程裁剪
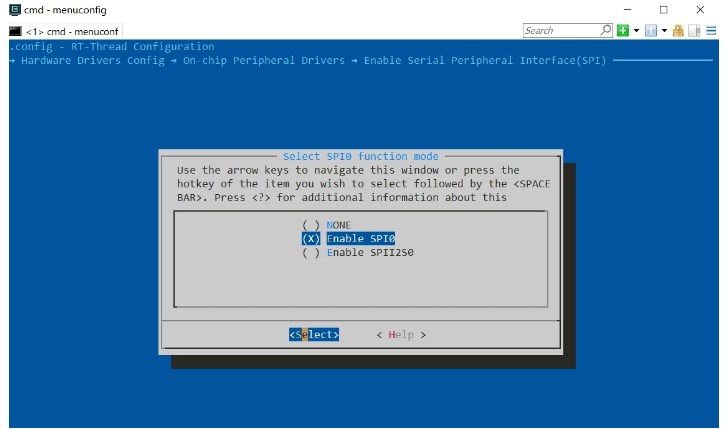
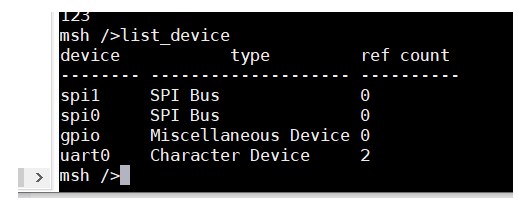
查看spi1总线是否使能
挂载spi外设
#include
#include "spi_flash.h"
#include "spi_flash_sfud.h"
#include "drv_spi.h"
#include "drv_gpio.h"
static int rt_hw_spi_flash_init(void)
{
rt_err_t result;
struct rt_spi_device spi_device;
char bus_name="spi0";
char device_name="spi01";
char spi_flash_dev_name="W25Q128";
nutool_modclkcfg_init_gpa();
CLK_EnableModuleClock(SPI0_MODULE);
/ Select SPI0 peripheral clock source as PCLK1 /
CLK_SetModuleClock(SPI0_MODULE, CLK_CLKSEL2_SPI0SEL_PCLK1, MODULE_NoMsk);
/ --------------------------------------------------------------------------------------------------------- /
/ Init I/O Multi-function /
/ --------------------------------------------------------------------------------------------------------- /
SYS->GPA_MFPL &= ~(SYS_GPA_MFPL_PA3MFP_Msk | SYS_GPA_MFPL_PA2MFP_Msk | SYS_GPA_MFPL_PA1MFP_Msk | SYS_GPA_MFPL_PA0MFP_Msk);
SYS->GPA_MFPL |= (SYS_GPA_MFPL_PA3MFP_SPI0_SS | SYS_GPA_MFPL_PA2MFP_SPI0_CLK | SYS_GPA_MFPL_PA1MFP_SPI0_MISO | SYS_GPA_MFPL_PA0MFP_SPI0_MOSI);
SYS->GPA_MFPL &= ~(SYS_GPA_MFPL_PA3MFP_Msk | SYS_GPA_MFPL_PA2MFP_Msk | SYS_GPA_MFPL_PA1MFP_Msk | SYS_GPA_MFPL_PA0MFP_Msk);
/* attach the device to spi bus*/
spi_device = (struct rt_spi_device *)rt_malloc(sizeof(struct rt_spi_device));
RT_ASSERT(spi_device != RT_NULL);
result=rt_spi_bus_attach_device(spi_device,device_name,bus_name,RT_NULL);
if (result != RT_EOK)
{
LOG_E("%s attach to %s faild, %dn", device_name, bus_name, result);
}
RT_ASSERT(result == RT_EOK);
LOG_D("%s attach to %s done", device_name, bus_name);
if (RT_NULL == rt_sfud_flash_probe(spi_flash_dev_name, device_name))
{
return -RT_ERROR;
}
return RT_EOK;
}
INIT_COMPONENT_EXPORT(rt_hw_spi_flash_init);
参考官方spi示例写代码
/*
程序清单:这是一个 SPI 设备使用例程
例程导出了 spi_w25q_sample 命令到控制终端
命令调用格式:spi_w25q_sample spi10
命令解释:命令第二个参数是要使用的SPI设备名称,为空则使用默认的SPI设备 程序功能:通过SPI设备读取 w25q 的 ID 数据
*/
#include
#include
#define W25Q_SPI_DEVICE_NAME "qspi10"
static void spi_w25q_sample(int argc, char *argv[])
{
struct rt_spi_device spi_dev_w25q;
char name[RT_NAME_MAX];
rt_uint8_t w25x_read_id = 0x90;
rt_uint8_t id[5] = {0};
if (argc == 2)
{
rt_strncpy(name, argv[1], RT_NAME_MAX);
}
else
{
rt_strncpy(name, W25Q_SPI_DEVICE_NAME, RT_NAME_MAX);
}
/ 查找 spi 设备获取设备句柄 */
spi_dev_w25q = (struct rt_spi_device )rt_device_find(name);
if (!spi_dev_w25q)
{
rt_kprintf("spi sample run failed! can't find %s device!n", name);
}
else
{
/ 方式1:使用 rt_spi_send_then_recv()发送命令读取ID /
rt_spi_send_then_recv(spi_dev_w25q, &w25x_read_id, 1, id, 5);
rt_kprintf("use rt_spi_send_then_recv() read w25q ID is:%x%xn", id[3], id[4]);
/ 方式2:使用 rt_spi_transfer_message()发送命令读取ID /
struct rt_spi_message msg1, msg2;
msg1.send_buf = &w25x_read_id;
msg1.recv_buf = RT_NULL;
msg1.length = 1;
msg1.cs_take = 1;
msg1.cs_release = 0;
msg1.next = &msg2;
msg2.send_buf = RT_NULL;
msg2.recv_buf = id;
msg2.length = 5;
msg2.cs_take = 0;
msg2.cs_release = 1;
msg2.next = RT_NULL;
rt_spi_transfer_message(spi_dev_w25q, &msg1);
rt_kprintf("use rt_spi_transfer_message() read w25q ID is:%x%xn", id[3], id[4]);
}
}
/ 导出到 msh 命令列表中 */
MSH_CMD_EXPORT(spi_w25q_sample, spi w25q sample);
心得体会
买的spi传感器还没有到,暂时没有没有测试读取数据,但是spi使能,挂载,完全没有问题,rt已经将spi的驱动,读写完成调用函数就行非常方便。

从profibusDP转ModbusTCP,一网打尽转换技巧!


 关注微信
关注微信