时间:2023-04-26 11:48
人气:
作者:admin
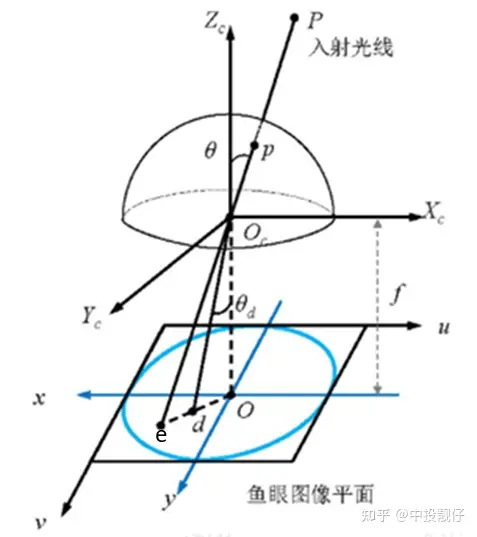 鱼眼相机模型经过P点的入射光线没有透镜的话,本应交于相机成像平面的e点。然而,经过鱼眼相机的折射,光线会交于相机成像平面的d点,就产生了畸变,因此畸变图像整体上呈现出像素朝图像中心点聚集的态势。而去畸变,就是将折射到d点的点,重新映射回到e点,因此去畸变之后的图像与原始的鱼眼图像相比,仿佛是把向心聚集的像素又重新向四周铺展开来。下表中的两幅图分别为鱼眼图和去畸变之后的展开图:
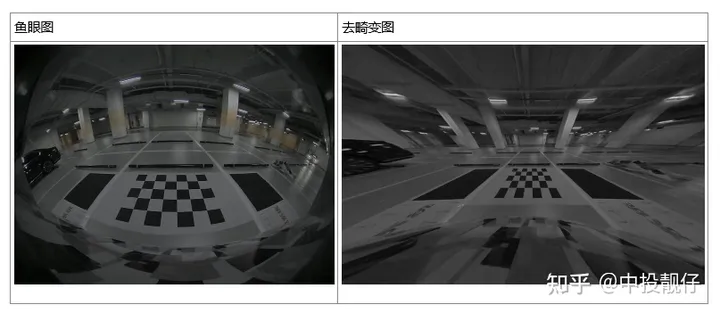 鱼眼相机的投影方式有很多种假设,例如等距投影、等立体角投影、正交投影、体视投影、线性投影。但是真实的鱼眼相机镜头并不完全遵循上述的这些模型假设。因此Kannala-Brandt提出了一种一般形式的估计,适用于不同类型的鱼眼相机:
 ,这个也是纳入opencv中的鱼眼相机畸变模型。现在基本上默认鱼眼相机模型遵循上述公式。公式中的 为光线入射角,r()为上图中 od 的长度。
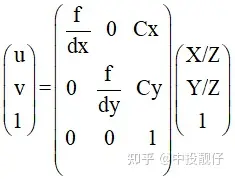 中间矩阵为内参计算公式
 畸变表通过畸变表可以得到畸变前后像素坐标的映射关系:其中angle表示光线的入射角 ,Real_Image_Height表示入射光线经过鱼眼相机透镜折射(出射角为 )与成像平面的交点(畸变点)。opencv Kannala-Brandt模型与畸变表之间的差异为:
 具体的实现方法可以使用python的curve_fit函数,即可拟合出合适的k0,k1,k2,k3,k4系数。上面提到opencv Kannala-Brandt与厂家给的畸变表之间相差一个系数:focal_length,因此,在做曲线拟合的时候,要把这部分考虑进去:
theta_input=data[:,0]*3.14/180 theta_fit=np.arctan(self.data[:,1]/0.95)#focal_lenth=0.95 distort_data,_=curve_fit(func1,theta_input,theta_fit) 综上,我们通过曲线拟合的方法得到了畸变参数。
@paramKCameraintrinsicmatrixf$cameramatrix{K}f$. @paramDInputvectorofdistortioncoefficientsf$distcoeffsfisheyef$. @paramRRectificationtransformationintheobjectspace:3x31-channel,orvector:3x1/1x3 1-channelor1x13-channel @paramPNewcameraintrinsicmatrix(3x3)ornewprojectionmatrix(3x4) @paramsizeUndistortedimagesize. @paramm1typeTypeofthefirstoutputmapthatcanbeCV_32FC1orCV_16SC2.SeeconvertMaps() fordetails. @parammap1Thefirstoutputmap. @parammap2Thesecondoutputmap. */ CV_EXPORTS_WvoidinitUndistortRectifyMap(InputArrayK,InputArrayD,InputArrayR,InputArrayP, constcv::Size&size,intm1type,OutputArraymap1,OutputArraymap2); 相机内参矩阵表示如下,其中 表示相机焦距 f 与相机cmos参数 的比值,这个 的物理意义为每个像素的实际长度,单位可以是mm/像素。 表示相机主点,即光心与图像平面相交的坐标,单位为像素。
 那么问题来了,为什么既需要鱼眼相机的内参,又需要输出图像的相机内参呢,它们之间是什么关系呢?最开始的时候,很多同学肯定是把这两个相机内参设置成一样的,即都设置成鱼眼相机的大小,如下图所示。代码中去畸变之后图像的内参是从鱼眼相机内参深拷贝过来的。
cv::MatR=cv::eye(3,3,CV_32F); cv::Matmapx_open,mapy_open; cv::Matintrinsic_undis; fish_intrinsic.copyTo(intrinsic_undis); //intrinsic_undis.at<float>(0,2)*=2; //intrinsic_undis.at<float>(1,2)*=2; cv::initUndistortRectifyMap( fish_intrinsic,m_undis2fish_params,R,intrinsic_undis, cv::Size(intrinsic_undis.at<float>(0,2)*2, intrinsic_undis.at<float>(1,2)*2), CV_32FC1,mapx_open,mapy_open); cv::Mattest; cv::remap(disImg[3],test,mapx_open,mapy_open,cv::INTER_LINEAR);
 左侧为鱼眼图,右侧为去畸变图
cv::MatR=cv::eye(3,3,CV_32F); cv::Matmapx_open,mapy_open; cv::Matintrinsic_undis; fish_intrinsic.copyTo(intrinsic_undis); intrinsic_undis.at<float>(0,2)*=2; intrinsic_undis.at<float>(1,2)*=2; cv::initUndistortRectifyMap( fish_intrinsic,m_undis2fish_params,R,intrinsic_undis, cv::Size(intrinsic_undis.at<float>(0,2)*2, intrinsic_undis.at<float>(1,2)*2), CV_32FC1,mapx_open,mapy_open); cv::Mattest; cv::remap(disImg[3],test,mapx_open,mapy_open,cv::INTER_LINEAR);
 去畸变图像相机参数的主点扩大了两倍,同时生成图像大小扩到两倍从上图中我们依然不能获得到右侧完整的黑色大方格,因此需要进一步扩大去畸变后图像相机主点位置以及生成图像的分辨率:
cv::MatR=cv::eye(3,3,CV_32F); cv::Matmapx_open,mapy_open; cv::Matintrinsic_undis; fish_intrinsic.copyTo(intrinsic_undis); intrinsic_undis.at<float>(0,2)*=4; intrinsic_undis.at<float>(1,2)*=4; cv::initUndistortRectifyMap( fish_intrinsic,m_undis2fish_params,R,intrinsic_undis, cv::Size(intrinsic_undis.at<float>(0,2)*2, intrinsic_undis.at<float>(1,2)*2), CV_32FC1,mapx_open,mapy_open); cv::Mattest; cv::remap(disImg[3],test,mapx_open,mapy_open,cv::INTER_LINEAR);
 现在我已经把去畸变图像相机内参的主点扩大为fish相机内参的4倍了,生成图像的长宽也放大了4倍,像素数量总体放大16倍,这样才勉强把大方格完全显示出来。我们知道提取角点需要用到图像处理算法,显然对这么大的图像做处理的效率非常低。
cv::MatR=cv::eye(3,3,CV_32F); cv::Matmapx_open,mapy_open; cv::Matintrinsic_undis; fish_intrinsic.copyTo(intrinsic_undis); intrinsic_undis.at<float>(0,0)/=4; intrinsic_undis.at<float>(1,1)/=4; /*intrinsic_undis.at<float>(0,2)*=4; intrinsic_undis.at<float>(1,2)*=4;*/ cv::initUndistortRectifyMap( fish_intrinsic,m_undis2fish_params,R,intrinsic_undis, cv::Size(intrinsic_undis.at<float>(0,2)*2, intrinsic_undis.at<float>(1,2)*2), CV_32FC1,mapx_open,mapy_open); cv::Mattest; cv::remap(disImg[3],test,mapx_open,mapy_open,cv::INTER_LINEAR);
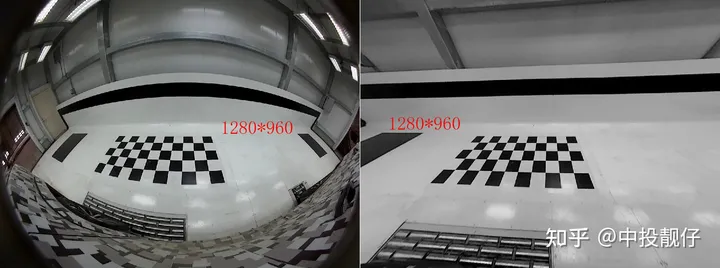
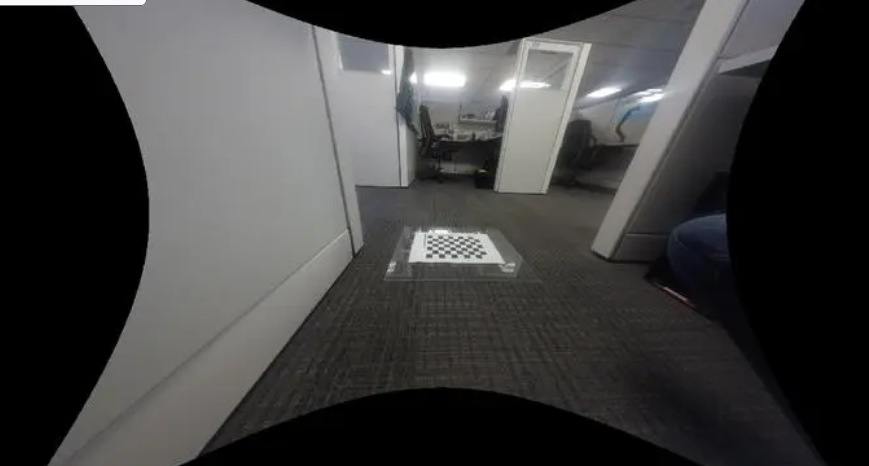
 左侧为鱼眼图,右侧为去畸变图,分辨率均为1280*960从图中可以看出,当我们仅将相机焦距缩小时,可以看到更多的东西。虽然去畸变之后的图像很小只有1280*960,但是却可以看到完整的方格。本节我们讨论了opencv API initUndistortRectifyMap函数的主点和f参数调节对于去畸变图像的影响,接下来的第3节,我们将会从去畸变算法原理入手,C++实现一波该算法。做这件事的原因很简单:opencv只提供了整张图像从undis2fish的映射,在avm的视角转换中,我们需要进行单个像素点的undis2fish,因此,我们需要自己实现一波这个去畸变过程。结论:缩小相机焦距可以使FOV增大,在更小分辨率的图像上呈现出更多的内容,看上去也是更加清晰。
 畸变映射关系鱼眼去畸变的算法实现就是遍历去畸变图像上的每一个点,寻找它们在鱼眼图像上的像素点坐标,计算它们之间的映射关系C++实现:
/* func:warpfromdistorttoundistort @paramf_dx:f/dx @paramf_dy:f/dy @paramlarge_center_h:undisimagecentery @paramlarge_center_w:undisimagecenterx @paramfish_center_h:fishimagecentery @paramfish_center_w:fishimagecenterx @paramundis_param:factoryparam @paramx:inputcoordinatexontheundisimage @paramy:inputcoordinateyontheundisimage */ cv::Vec2fwarpUndist2Fisheye(floatfish_scale,floatf_dx,floatf_dy,floatlarge_center_h, floatlarge_center_w,floatfish_center_h, floatfish_center_w,cv::Vec4dundis_param,floatx, floaty){ f_dx*=fish_scale; f_dy*=fish_scale; floaty_=(y-large_center_h)/f_dy;//normalizedplane floatx_=(x-large_center_w)/f_dx; floatr_=static_cast<float>(sqrt(pow(x_,2)+pow(y_,2))); //Lookuptable /*intnum=atan(r_)/atan(m_d)*1024; floatangle_distorted=m_Lut[num];*/ floatangle_undistorted=atan(r_);//theta floatangle_undistorted_p2=angle_undistorted*angle_undistorted; floatangle_undistorted_p3=angle_undistorted_p2*angle_undistorted; floatangle_undistorted_p5=angle_undistorted_p2*angle_undistorted_p3; floatangle_undistorted_p7=angle_undistorted_p2*angle_undistorted_p5; floatangle_undistorted_p9=angle_undistorted_p2*angle_undistorted_p7; floatangle_distorted=static_cast<float>(angle_undistorted+ undis_param[0]*angle_undistorted_p3+ undis_param[1]*angle_undistorted_p5+ undis_param[2]*angle_undistorted_p7+ undis_param[3]*angle_undistorted_p9); //scale floatscale=angle_distorted/(r_+0.00001f);//scale=r_disonthecameraimgplane //divider_undisonthenormalizedplane cv::Vec2fwarp_xy; floatxx=(x-large_center_w)/fish_scale; floatyy=(y-large_center_h)/fish_scale; warpPointOpencv(warp_xy,fish_center_h,fish_center_w,xx,yy,scale); returnwarp_xy; } voidwarpPointOpencv(cv::Vec2f&warp_xy,floatmap_center_h,floatmap_center_w, floatx_,floaty_,floatscale){ warp_xy[0]=x_*scale+map_center_w; warp_xy[1]=y_*scale+map_center_h; } 针对上述代码,我们由浅入深地讲述算法流程
鱼眼相机成像模型上述代码中令fish_scale为1,先讨论最简单的,即让去畸变图像相机参数中的, 大小与鱼眼图相同,对照鱼眼相机模型这张图和代码,我们来梳理一下算法流程:算法流程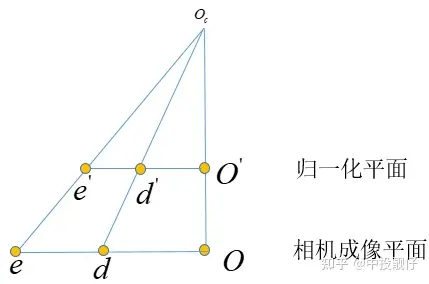 总体来讲这个基础的鱼眼去畸变算法的实现思路就是:在归一化平面上计算去畸变前后的像素坐标scale,然后运用到图像平面上。
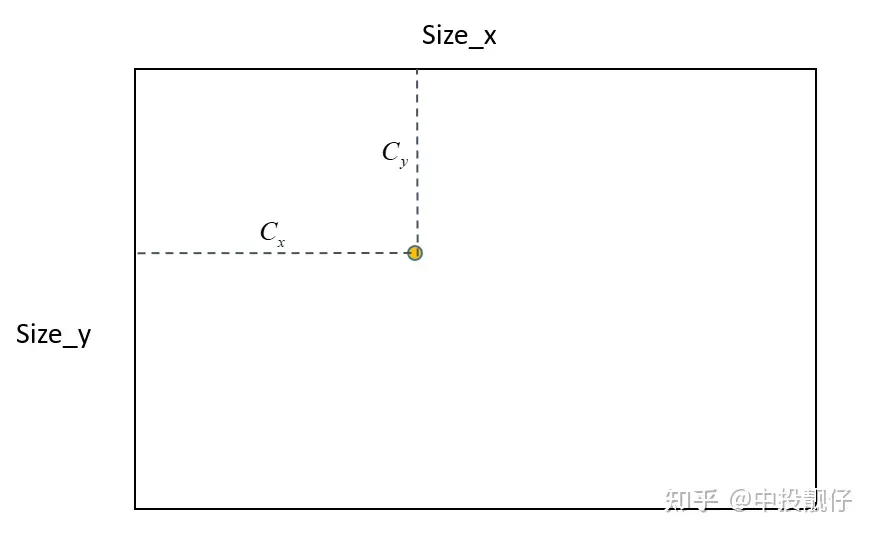 主点位置示意图如上图所示,输出的去畸变图大小为Size,去畸变图相机内参中的主点位置为 ,在算法的实现中,首先会创建Size大小的mesh_grid,即map,确定主点的位置,然后根据mesh_grid上每个点的坐标,计算其与主点的相对位置,然后进行后续的计算(转换到归一化平面、计算scale等),因此根据这个逻辑如果上面的主点不在Size的中心,就会导致相机实际拍摄到内容的中心在主点区域,但是右下角会有很多的延申。例如下图这种:
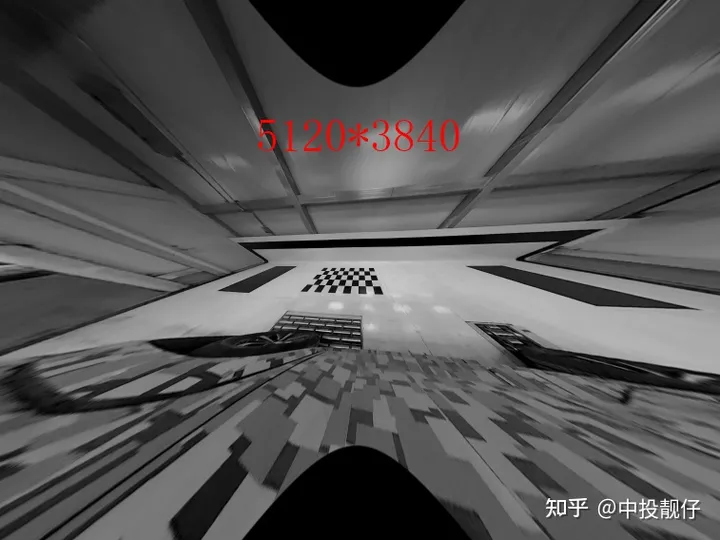
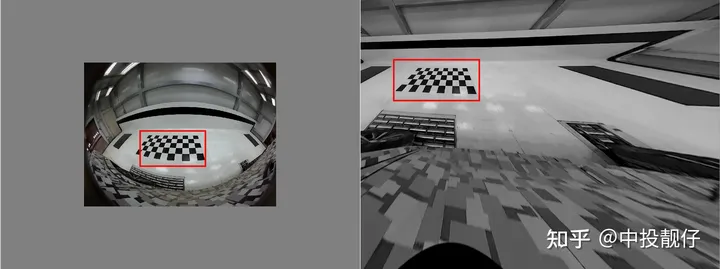 从上图原始的鱼眼图中可以看出相机拍摄的内容中心大概在棋盘格附近,然而去畸变了之后棋盘格却跑到了左上角。这就是因为我们设置的主点偏左上,没有位于生成的去畸变图的中心。这就是2.2节中提到的:initUndistortRectifyMap函数中的size参数一般都是与去畸变之后图像的相机参数中主点大小强相关的。
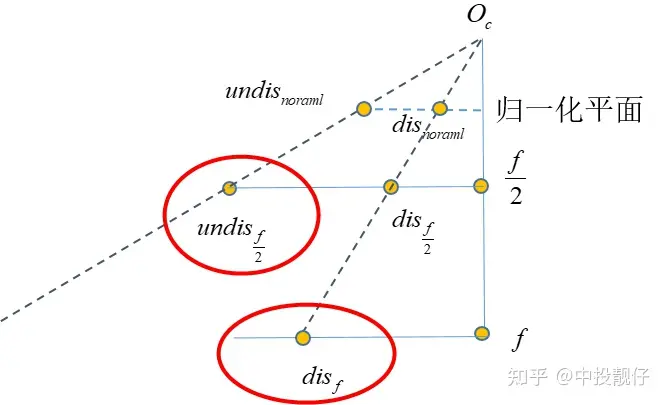
 相机焦距调整示意图上图中相机的真实焦距为f,假设cmos长度不变,我们只是把成像平面放在了 f/2 的位置上,显然调整焦距后的相机FOV更大,能够看到的东西越多。同理,对于标定车间中的大方格,假设我们调参使得 , 缩小一定的倍数,理论上就可以看到更多的内容。
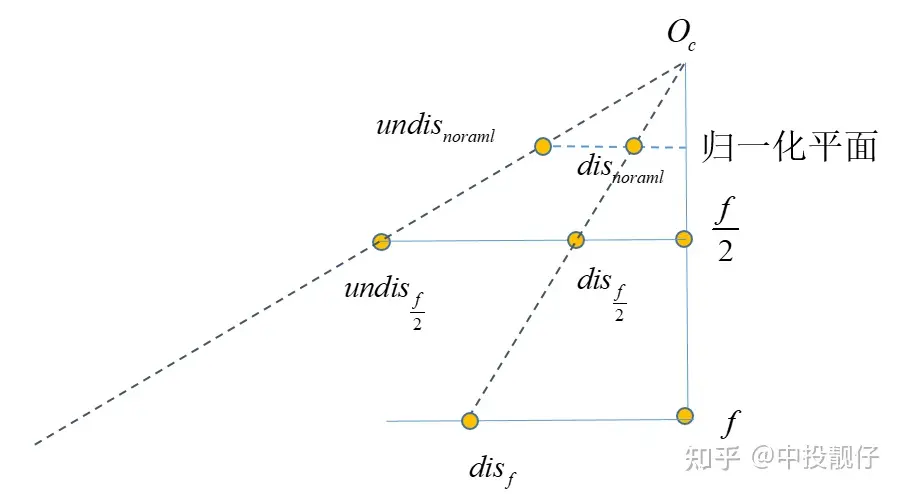 将相机内参 f 缩小为 f/2 意味着我们将相机的cmos推导距离相机光心 f/2 处,在这个平面上做映射。算法流程如下:
 方程的问题,用到非线性优化,速度很慢。因此我们通过畸变表,构建了一个多项式,通过反向拟合的方法,提前拟合出fish2undis的方程系数:
#forward self.distor_para,_=curve_fit(self.func,self.data[:,0],self.data[:,1]) #inverse f_inverse_para,_=curve_fit(self.func_inverse,self.data[:,1],self.data[:,0]) 计算fish2undis的过程与undis2fish(3.1,3.2)的过程略有不同,但都是寻找 与 之间的映射关系,因为 f 平面才是我们真实拿到的fish图,我们最终还是要在这个原始的fish图上找点。
 实现代码:
实现代码:cv::Vec2fCalibrateInit::warpFisheye2Undist(floatfish_scale,floatf_dx,floatf_dy,floatundis_center_h, floatundis_center_w,floatfish_center_h, floatfish_center_w,cv::Vec4dundis_param,floatx, floaty){ //f_dx*=fish_scale; //f_dy*=fish_scale; floaty_=(y-fish_center_h)/f_dy;//normalizedplane floatx_=(x-fish_center_w)/f_dx; floatr_distorted=static_cast<float>(sqrt(pow(x_,2)+pow(y_,2))); floatr_distorted_p2=r_distorted*r_distorted; floatr_distorted_p3=r_distorted_p2*r_distorted; floatr_distorted_p4=r_distorted_p2*r_distorted_p2; floatr_distorted_p5=r_distorted_p2*r_distorted_p3; floatangle_undistorted=static_cast<float>(r_distorted+ undis_param[0]*r_distorted_p2+ undis_param[1]*r_distorted_p3+ undis_param[2]*r_distorted_p4+ undis_param[3]*r_distorted_p5); //scale floatr_undistorted=tanf(angle_undistorted); floatscale=r_undistorted/(r_distorted+0.00001f);//scale=r_disonthecameraimgplane //divider_undisonthenormalizedplane cv::Vec2fwarp_xy; floatxx=(x-fish_center_w)*fish_scale; floatyy=(y-fish_center_h)*fish_scale; warpPointInverse(warp_xy,undis_center_h,undis_center_w,xx,yy,scale); returnwarp_xy; } voidCalibrateInit::Vec2f&warp_xy,floatmap_center_h,floatmap_center_w, floatx_,floaty_,floatscale){ warp_xy[0]=x_*scale+map_center_w; warp_xy[1]=y_*scale+map_center_h; }
审核编辑 :李倩
上一篇:电动机常见的点动电路和自锁电路


 关注微信
关注微信